Onyx Documentation v1.2
Onyx - jQuery Instagram Gallery
Created: 7/5/2014
By: Faraz Kelhini
Email: farazkelhini@gmail.com
Thank you for purchasing Onyx. I hope you enjoy this script and produce fantastic apps. I look forward to hearing your feedback and seeing what you come up with! If you have any questions that are beyond the scope of this help file, please feel free to email via my user page contact form here.
Table of Contents
HTML Structure JavaScript CSS Image Installation Configuration FAQ Sources and CreditsHTML Structure
Onyx has a simple HTML structure. The following is an example of a simple page with necessary Onyx components:
				<!DOCTYPE html>
				<html>
					<head>
						<meta charset="utf-8">
						<meta http-equiv="X-UA-Compatible" content="IE=edge">
						<title>ONYX</title>
						<meta name="viewport" content="width=device-width, initial-scale=1">
						<link rel="stylesheet" href="css/onyx.min.css">
						<script src="js/modernizr.custom.js"></script>
					</head>
					<body>

						<ul id="og-grid" class="og-grid da-thumbs">
							<!-- This element will be populated with images and data retrieved from Instagram. -->
						</ul>

						<script src="//ajax.googleapis.com/ajax/libs/jquery/1.11.0/jquery.min.js"></script>
						<script>window.jQuery || document.write('<script src="js/jquery-1.11.0.min.js"><\/script>')
						</script>
						<script src="js/onyx.min.js"></script>
					</body>
				</html>
The modernizr.custom.js should be placed in the head tag of the page. Other scripts like jQuery and onyx.js can be added before the closing body tag. When the code runs, the empty <ul> element in the body tag will be populated with images and data retrieved from Instagram database.
JavaScript
Onyx uses three Javascript files:
- Modernizr - a JavaScript library that detects HTML5 and CSS3 features in the user’s browser.
- jQuery - a fast, small, and feature-rich JavaScript library.
- Onyx.js - Contains the core functionality of Onyx. I have incorporated a few "tried and true" plugins inside the file to create some effects.
You won't need to manually edit anything in these files.
CSS
The only css file that Onyx needs for styles is onyx.min.css which is located in the css folder. If you want to change the styles of the gallery, simply include your own css file on the page after the default css file:
			<link rel="stylesheet" href="css/onyx.min.css" >
			<link rel="stylesheet" href="css/yourStylesheet.css" >
An unminified version of css is also included in the css folder in case you want to directly edit the styles.
Image
The gallery uses two images, "bg.png" and "like.png", which are located in the img folder. The rest of images in the folder are used on pages like quickstart.html, settings.html, etc.
The "bg.png" is used as the background image of the gallery, and the "like.png" is used in the hover effect. You can replace these images with your own images.
Installation
This section explains the installation of Onyx in details, you can refer to Quick Start instead if you want to set up your page more quickly.
Step 1
Upload the necessary files to your server:
				css/onyx.min.css
				js/onyx.min.js
				js/modernizr.custom.js
				js/jquery-1.11.0.min.js
				js/settings.js
				img/like.png
				img/bg.png
Step 2
Insert the Onyx stylesheet into the head tag of your page.
<link rel="stylesheet" href="css/onyx.min.css" >
Make sure the path correctly point to the css file. This file contains the default styles of the gallery. It has been tested to look identical on different browsers.
Step 3
Include Modernizer. It's required for the effects to work (insert it into the head tag of your page).
<script src="js/modernizr.custom.js"></script>
So the head section of your document should look something like this:
				<head>
					<meta charset="utf-8">
					<meta http-equiv="X-UA-Compatible" content="IE=edge">
					<title>Onyx</title>
					<meta name="description" content="Onyx - jQuery Instagram Gallery">
					<meta name="viewport" content="width=device-width, initial-scale=1">
					<link rel="stylesheet" href="css/onyx.min.css">
					<script src="js/modernizr.custom.js"></script>
				</head>
Step 4
Insert the following unordered list element into the body tag of your page. This element will be populated with images and data retrieved from Instagram.
				<ul id="og-grid" class="og-grid da-thumbs">
				</ul>
Step 5
Include jQuery right before the closing body tag. If you have already included jQuery in your page, you shouldn't include it second time.
				<script src="//ajax.googleapis.com/ajax/libs/jquery/1.11.0/jquery.min.js"></script>
				<script>window.jQuery || document.write('<script src="js/jquery-1.11.0.min.js"><\/script>')</script>
The first line of code downloads the jQuery library from Google servers, if for some reason the library is not accessible, the second line of code loads the library from your js folder.
Step 6
Insert the onyx.min.js just before the closing body tag.
<script src="js/onyx.min.js"></script>
Now the end of you page should look something like this:
			<script src="//ajax.googleapis.com/ajax/libs/jquery/1.11.0/jquery.min.js"></script>
			<script>window.jQuery || document.write('<script src="js/jquery-1.11.0.min.js"><\/script>')</script>
			<script src="js/onyx.min.js"></script>
			</body>
			</html>
Now that your HTML is ready, you need to tell the application from which user you want to get data. It is explained in the next section.
Step 7
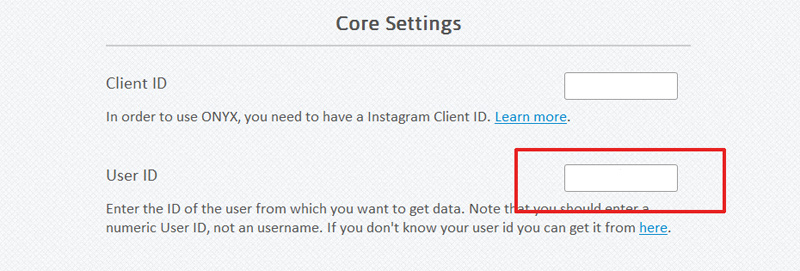
To get a user's data from Instagram, you need to know his/her User ID. You can get the User ID by entering their usename in this app.

Once you get the User ID, copy and paste it in User ID field on settings page.
Step 8
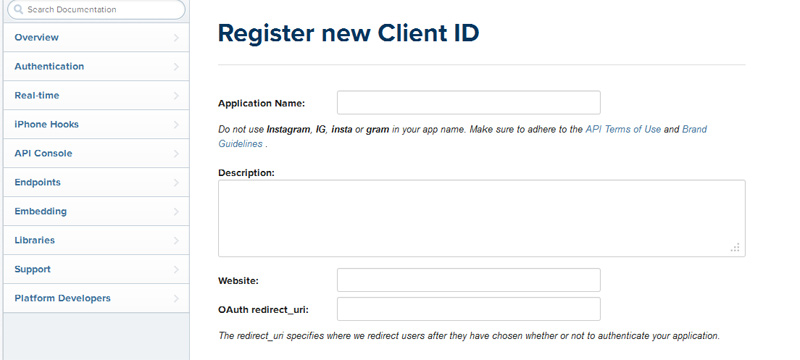
Instagram requires you to have a client ID in order to get data from their database. To get your Client ID, go to Instagram developer page and Login to your account.
If you do not already have an Instagram account, download the Instagram app in the App Store on an iOS device (iPhone, iPod, iPad) or in Google Play for an Android device. After installing the app, open it on your device and tap the Sign up button to begin the account creation process.
After logging in on Instagram developer page, click on Manage Clients (or Register Your Application button). Fill out the required fields and sign up.

Click on Manage Clients again and then click on Register a new client. You can use your site name as the application name and insert the url of your site in the last two fields.
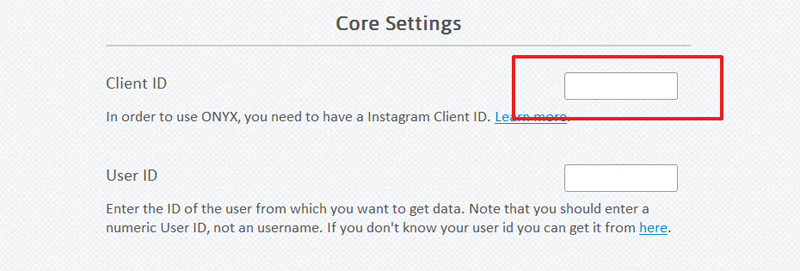
Once you get the Client ID, copy and paste it in Client ID field on settings page.
Click on the "generate code" button, and follow the instructions to apply changes.
Configuration
Onyx comes with a whole bunch of configurable options. A simple interface, which is accessible on settings.html page, allows you to easily make changes.
FAQ
Q. Why Chrome doesn't show the gallery when I run the script on my computer?
A. Chrome security features doesn't allow some files to be loaded when you run the script on your computer. It's a choice by the Chrome developers, but other browsers work fine. To view the gallery on Chrome you should run the script on a server. If you want to view it on your computer, you can install a web server package like Xampp or Wamp
Sources and Credits
- jquery syntaxhighlighter (documentation.html) - http://balupton.github.io/jquery-syntaxhighlighter/demo/
- jQuery UI - v1.10.4 (settings.html) - http://jqueryui.com
- jquery - 1.11.0 (example.html, settings.html, user_id_finder.html) - http://jquery.com
- jquery.switchButton (settings.html) - olivier.lance@sylights.com
- Timeago jQuery plugin (example.html) - http://timeago.yarp.com/
- Imagesloaded (example.html) - https://github.com/desandro/imagesloaded
- jquery.hoverdir.js (example.html) - http://www.codrops.com
- modernizr custom (example.html) - http://modernizr.com/.com